- Remote Alarm For Smoke Detector
- Powerful Security Siren
- Mini Alarm
- Laptop Protector
- Bell Alarm
- A 5-Digit Alarm Control Keypad
- A 4-Digit Alarm Control Keypad
- A Battery-Powered One-Time-Only Burglar Alarm
- An Enhanced Shed / Garage Alarm
- A Shed / Garage Alarm
- A Simple Fire-Door Alarm
- A Simple Shop-Door Alarm
- Four Small Transistor Alarm Circuits
- A Dozen Small Cmos Alarm Circuits
- A Cmos 4060 Burglar Alarm
Bell Alarm
Description
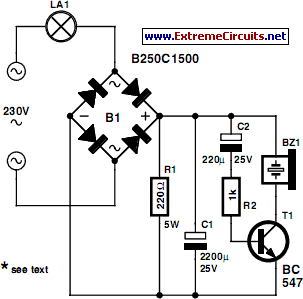
If you use a lamp with a motion sensor for outdoor lighting, the original electrical switch is actually no longer necessary. If you replace the switch with the circuit described here, an acoustical signal will be generated each time the outdoor lamp is switched on. It’s thus somewhere between an alarm and a doorbell. The operating principle is simple. A circuit that causes a voltage drop of only a couple of volts is connected in series with the lamp. As the circuit needs a DC voltage, the current for the lamp is passed through a bridge rectifier.
The voltage drop across the circuit is determined by R1. The function of C1 is to smooth the raw DC voltage. Note that this is not an example of peak rectification, but instead of averaging. For this reason, the voltage on C1 is lower than you might expect. Ultimately, the DC voltage on C1 reaches the same value as the average voltage across R1. For example, consider what happens with a 100-W lamp. For convenience, we can assume that the lamp has a resistance of 529 R. If we ignore the voltage across the diodes and the voltage across R1, the current is approximately 0.39 A on average (not 0.43 A).
This is because the average mains voltage is only 207 V = (230 × v2) ÷ (p/2). This yields a voltage of approximately 8.5 V on C1. As the buzzer and T1 only draw a few milliampères from C1, in practice the voltage will differ from this value by at most a few tenths of a volt. Here you should use a DC buzzer with a large operating voltage range. A good example is the CEP-2260A, which has a voltage range of 3–20 V (available from Digi-Key and other online sources). The charging time of C2 determines how long the buzzer remains energised, and here it will be a few tenths of a second.
Circuit diagram
Depending on how much current the buzzer draws, you can increase the value of R2 in order to extend the time (this is certainly necessary with the above-mentioned buzzer type). Depending on the lamp power, you can consider adjusting the value of R1. This will certainly be necessary if you use a 150-W lamp or larger. In this case, cut the value of R1 in half, primarily because the power dissipation will otherwise be too large. In the example described here, it is around 3 watts. The bridge rectifier also deserves special attention.
A large current can flow briefly when the lamp is switched on ‘cold’. A 250V, 1.5-A bridge rectifier is adequate for a 100-W lamp, but heavier-duty diodes are necessary with higher lamp power – such as the 1N5408 (1000 V / 3 A). Due to the heat generated by R1, make sure that R1 is located a certain distance away from the other components in the assembled circuit. Also bear in mind that the entire circuit is connected to mains potential. Never make any adjustments while the circuit is connected to the mains! It’s thus a good idea to test the circuit before fitting it into the switch box.
